If you've ever worked with electrical distribution systems-whether in a commercial warehouse, a manufacturing facility, or a data center-you know that even the smallest component can make or break safety and functionality. As a supplier of busbar busbar joint connectors, I've spent years talking to electricians, maintenance supervisors, and system designers who've seen firsthand what happens when these parts are overlooked: loose connections that cause overheating, arcing that leads to downtime, or even shock hazards that put teams at risk. The truth is, busbar systems are designed to handle high currents, but their safety depends entirely on how well every joint is built and maintained. Over the years, I've compiled a list of non-negotiable safety precautions that every team should follow when working with these critical parts, drawn from on-site calls, industry standards, and lessons learned from projects big and small.


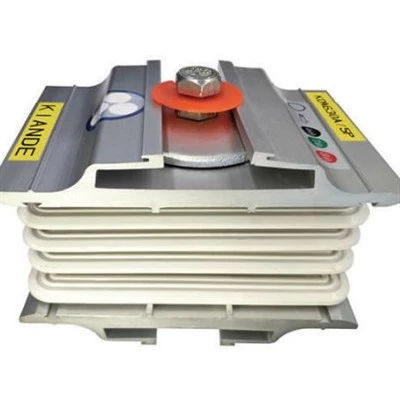
First, let's start with the basics of what a busbar joint connector does. These connectors are the link between individual busbars, which are rigid metal bars that carry electrical power throughout a system. Unlike wires, busbars are made for high-capacity current, so their joints have to be tight, corrosion-free, and properly insulated to prevent faults. I can't tell you how many times I've heard a technician say, "We just hand-tightened that connector last year and it's fine." But that casual mistake is one of the top causes of joint failure. When a connection is under-torqued, the contact surface between the busbar and the connector isn't full-so electricity has to crowd through a smaller area, creating resistance. That resistance turns into heat, and over time, that heat can soften the busbar, loosen the connection even more, or start a fire if it's in a space with dust or flammable materials. The fix here might seem simple, but it requires specific tools and knowledge. You can't use a regular wrench; you need a torque wrench calibrated to the exact specification of your connector, and you have to follow the sequence of tightening bolts if it's a multi-bolt design.
Next up is choosing the right connector and complementary accessories. A lot of teams make the mistake of using a connector that's too small for their busbar size or current load. I once worked with a plant manager who tried to repurpose a general-purpose connector for a 1,000-amp busbar system, and within six months, the connection started arcing badly. The right component starts with selecting a busbar joint connector rated for your system's maximum current, ambient temperature, and environment. If your space is humid, dusty, or has chemicals, you also need to look for connectors with corrosion-resistant plating, like tin or silver, to prevent oxidation. Along with the main connector, don't skip the supporting parts that make the joint safe. For plug-and-play setups, a compatible Busbar Plug Socket ensures a secure, low-resistance connection that reduces the risk of accidental disconnection. Double-head bolts are another key part; they let you tighten both the busbar and the connector without stripping threads, which is a common issue when using standard bolts. I always tell customers to pick bolts that match the connector's thread size and grade- Grade 8 bolts are usually the best for busbar applications because they have higher tensile strength. Insulation parts are non-negotiable too: Busbar Insulation Tube covers exposed bolt heads and busbar ends to prevent accidental contact with other conductive parts, while Busbar Insulation Plate creates a barrier between the busbar system and nearby metal structures, like frame rails or ducts, which can cause short circuits if they're even a little conductive. I've seen projects where teams tried to skip insulation parts to save time or money, and the result was a shutdown that cost thousands of dollars in lost production.
Once you've got the right parts, installation is where most safety gaps happen. The first step before even touching the busbar is power isolation. I know it sounds like a no-brainer, but you'd be surprised how many technicians skip this step to "save time." Before working on any busbar system, lock out and tag out the power source-this means turning off the breaker, locking it in the off position, and attaching a tag that says "Do Not Operate" with your name. If you're working on a high-voltage system, you should also use a voltage tester to double-check that there's no current present, even after the breaker is off. Once the power is isolated, prep the busbar surfaces properly. You can't just bolt a connector onto a dirty, oily, or oxidized busbar-those substances create a barrier that increases resistance. We always recommend using a wire brush or steel wool (not sandpaper, which leaves grit that can get stuck) to clean the contact surfaces until they're shiny and free of debris. Some technicians also apply a thin layer of anti-oxidant compound, like conductive grease, to the surfaces after cleaning-this helps prevent future corrosion and reduces resistance even more. When installing the bolts, alternate tightening them in a crisscross pattern (like tightening the top left, then bottom right, then top right, then bottom left) instead of tightening one all the way first. This ensures even pressure across the entire contact surface, which prevents uneven connections and overheating. I've seen connectors that failed because bolts were tightened unevenly, even if the total torque was correct.
After installation, regular inspection and maintenance are crucial for long-term safety. Busbar systems aren't "set it and forget it" components-they expand and contract with temperature changes, vibration from nearby equipment, and time, which can loosen joints over months or years. The frequency of inspections depends on your environment: if you're in a dusty manufacturing plant or a space with extreme temperature swings, you should inspect every 6 months; for a stable data center, once a year is usually enough. During inspections, use a thermal imaging camera to check for hot spots on the connectors. A hot spot 10 degrees above the ambient temperature is a sign that the connection is loose or corroded, and needs immediate attention. You can also use a torque wrench to spot-check bolts to make sure they're still at the correct specification. Another common issue we see is moisture getting into enclosures that house busbar systems. If your enclosure has rubber gaskets, make sure they're not cracked or worn, and that the enclosure door is sealed properly-moisture can cause corrosion on connectors and busbars, leading to resistance and overheating. If you have an outdoor busbar system, you should also add extra protection, like weather-sealed covers for connectors, to prevent rain and snow from getting inside.
Training is the final piece of the puzzle that many companies overlook. I've worked with teams where a new technician was assigned to install busbar connectors without any formal training, and they either under-torqued bolts or used the wrong parts. Busbar systems require specialized knowledge-you can't rely on general electrical training. Make sure all team members who work with busbar connectors have hands-on training that covers not just installation, but also safety protocols, how to identify faulty connections, and when to call a professional. For example, if a thermal scan shows a hot spot that's 30 degrees above ambient, that's not a DIY fix-it could mean a corroded busbar or a damaged connector that needs to be replaced. We offer training resources for our customers, including installation guides and video tutorials, because we know that even the best product won't be safe if it's installed incorrectly.
As a supplier, our goal isn't just to sell you a busbar joint connector-it's to make sure your system is safe and reliable for years to come. That's why we provide detailed product specifications, torque charts, and access to our team of technical experts who can help you select the right parts for your application. Whether you need a standard connector for a low-voltage system, corrosion-resistant parts for a harsh environment, or complementary accessories like a Busbar Plug Socket or Busbar Insulation Plate, we have the solutions you need to keep your busbar system running safely. If you have questions about which parts are right for your project, or if you need help with installation or maintenance guidelines, feel free to reach out to our team to discuss your needs.
References
- National Fire Protection Association. (2021). NFPA 70: National Electrical Code, Article 372: Busways. Quincy, MA: NFPA.
- Underwriters Laboratories. (2022). Standard for Busway Systems, UL 857. Northbrook, IL: UL LLC.
- IEEE. (2019). IEEE Recommended Practice for Electrical Installations on Shipboard - AC Systems, IEEE Std 45-2019. Piscataway, NJ: Institute of Electrical and Electronics Engineers.
- Electrical Construction Maintenance. (2023). "Common Busbar Joint Failures and How to Prevent Them." ECM Media Group.